Shower drain installation may appear to be a straightforward task, but it’s one of the processes where DIY experts and professionals go wrong despite being most skilled in it. A poorly installed drain will not just cause water damage and odors but will also incur costly repairs in the long run.
So in order to help you, here is a detailed guide about common shower drain installation mistakes and how to avoid them. Whether remodeling your bathroom or building from the ground up, understanding the details of shower drain installation will save time, money, and aggravation.
So, let’s get started.
I. Why Proper Shower Drain Installation Matters
Before getting straight to the most common errors, it’s essential to know why accuracy in installing a shower drain is so important. A correctly installed drain:
- Avert water seepage and structural damage.
- Guarantees quick and efficient water runoff.
- Prevents foul smells of sewer gas.
- Keeps the area clean and mold-free.
Failing to do it correctly will result in cracked tiles, rotting subfloors, and the development of mildew and mold.
II. Top Shower Drain Installation Mistakes (and How to Avoid Them)
Let’s discuss the most common mistakes in detail, along with practical solutions to guide you in avoiding them.
1. Incorrect Slope or Drainage Angle
One of the most common mistakes is not to slope the shower floor correctly to the drain. This results in water pooling instead of draining directly into the drain.
The Solution?
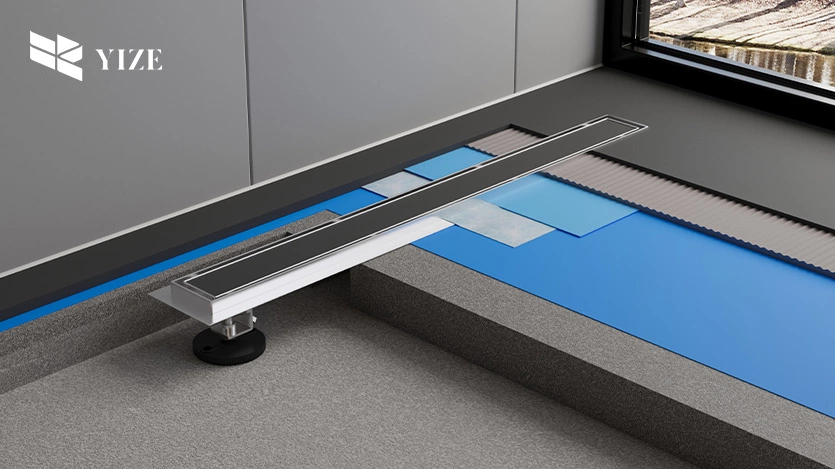
The shower floor should be sloped at least 1/4 inch per foot towards the drain. Utilize a level to install and verify slope measurements from a range of different angles. For tile showers, the installation of a pre-sloped shower and mortar bed preserves uniform angles of drainage.
2. Poor Drain Height Alignment
Too high or too low a drain setting in relation to the finished floor will result in sealing complications or standing water near the drain.
The Solution?
Plan the drain height prior to pouring the concrete or installing the tiles. The top of the drain flange should be at the same level as the finished tile surface to permit a seal and uniform water flow.

3. Improper Sealing and Waterproofing
Omitting waterproofing steps or the use of substandard sealant near the drain will permit water to seep into the subfloor or wall cavities.
The Solution?
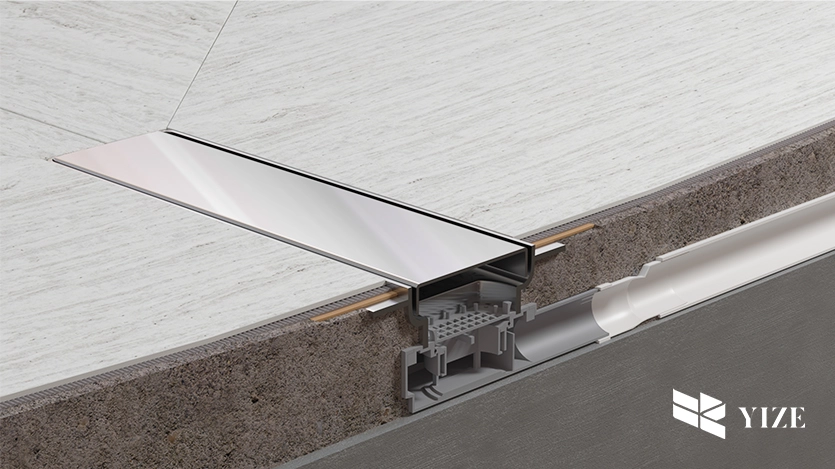
Utilize a high-quality, water-resistant membrane below the shower floor and along the walls (minimum of 3-6 inches in height). Secure silicone sealant to the drain body, and seal any gaps between the flange and adjacent surfaces. A pre-installation leak test is also highly advisable.
4. Not Using a Trap or Vent Pipe
They either leave it out or install it in the wrong manner. This creates openings for sewer gases to ascend through the drain and cause offensive odors and potential health risks.
The Solution?
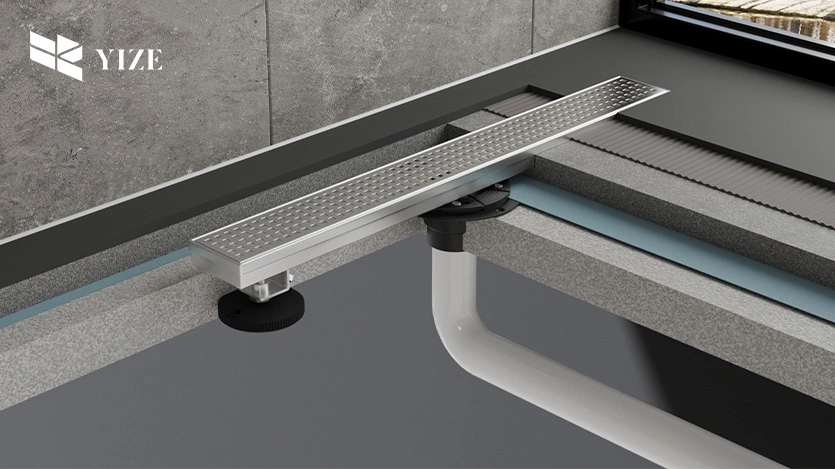
Always install a P-trap below the shower drain. It should be vented correctly through the plumbing to avoid siphoning. Refer to your local building codes, generally requiring a vent to be within 5 feet from the trap.
5. Incompatible Drain and Shower Base Types
Using a drain that isn’t compatible with the material or the composition of the shower base (such as acrylic, tile, or fiberglass) will create leaks or misfits.
The Solution?
Always pair the drain type with the base material. For instance:
Tile bases: Utilize adjustable height drains and weep holes.
Fiberglass or acrylic pans: Utilize a compression-type or solvent-weld drain that’s designed for pre-fabricated bases.
6. Neglecting Weep Holes in Tile Showers
Weep holes, small channels that allow water to escape from beneath the tile into the drain, usually get clogged with mortar or sealant when tiles are installed.
The Solution?
Protect the weep holes with gravel, spacers, or a weep hole protector ring before the mortar is applied. This keeps water from building up below the tile and creating mold.
7. Using the Wrong Pipe Size
Various individuals employ too narrow-diameter pipes, which reduce the rate at which water drains and raise the likelihood of clogging.
The Solution?
A minimum shower drain pipe diameter of 2 inches is recommended. This will enable improved water flow and minimize backup.
8. Inadequate Access for Future Repairs
Covering the entire drain assembly in concrete or tile with no access increases the difficulty and expense of future maintenance.
The Solution?
Install the access panel at the rear of the drain wall or, if possible, in the nearest adjacent closet. Utilize drain covers and modular shower pan systems that can be disassembled when repairs might be necessary.
9. Rushing the Job Without Testing
Some installers skip leak and drainage tests before sealing everything permanently, only to discover problems afterward.
The Solution?
Do a flood test prior to closing and tiling by plugging the drain and flooding the shower base with water. Inspect all joints and the surrounding area of the drain for leaks. Test the drain’s rate of emptying as well.
III. Bonus Tips for a Flawless Shower Drain Installation
Here are some tips that will assist you
- Inspect your area’s plumbing regulations: Various areas have varied plumbing regulations, particularly regarding such things as piping size, grade, and venting. Be sure to inspect your area’s codes prior to commencing, lest you encounter issues down the road.
- Use high-quality materials: It pays to invest in a durable drain, sturdy pipes, and long-lasting waterproofing. Low-cost materials will deteriorate sooner and result in leaks.
- Seek assistance if you’re not clear. If it seems unclear or you don’t feel comfortable, call a plumber or professional. It’s safer to receive assistance than to attempt it incorrectly and create water damage.
- Perform a leak test before completing: Before sealing or tiling, plug the drain and fill the shower pan with water. Allow it to sit there for at least 24 hours to ensure that there isn’t any leak.
- Leave weep holes open: When installing tile, be sure to have the little weep holes on the periphery of the drain cleared of any obstructions.
IV. How YZDRAIN Can Help You Further?
As you go about planning a new shower installation or a shower renovation, selecting the correct drain becomes imperative. YZDRAIN, a China-based manufacturer and provider of stainless steel shower drains, provides the perfect solutions to suit your requirements.

This is how YZDRAIN can help you:
1. Robust and Long-Lasting Products
YZDRAIN has a wide variety of drains—such as linear, square, and corner drains—constructed from high-grade stainless steel. YZDRAIN’s products are durable and rust-resistant.
2. Custom Designs Available
Want a special size, style, or color? YZDRAIN offers customized solutions (OEM/ODM), allowing the drain to perfectly match your bathroom design.
3. Smart Features
Their sinks feature useful features such as
- A 360-degree rotating outlet for simple installation
- Dry and Wet Odor Control Traps
- Stabilizing ABS flanges to avoid shifting
4. Quality Certification
Their products are CUPC, Watermark, and BS EN 1253-compliant, so you can be sure that you’re getting something safe and reliable.
5. Quick Production and Quality Tests
YZDRAIN employs sophisticated machinery and strict inspection processes to ensure every drain is top-quality before it ships.
6. Global Support
They assist clients in more than 47 countries and they provide quick service, free quotes, and professional assistance when you need it.
V. Conclusion
Shower drain installation isn’t merely about plumbing connections—it’s about creating a safe, watertight space that will last for years to come. With the most common pitfalls referred to in this guide avoided, not only will your bathroom last longer, but your home will be cleaner and healthier too.
Whether it’s a DIY project or one in collaboration with a contractor, investing the time to get the details correct will always be rewarded.