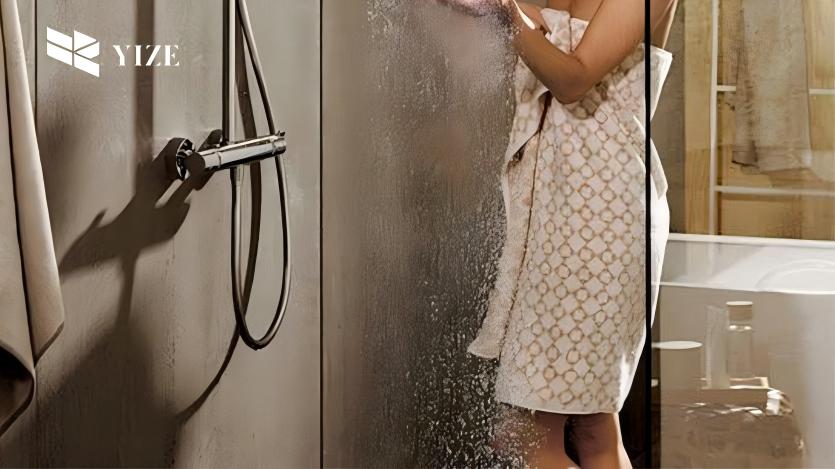
That gurgling sound from your shower drain isn’t just annoying—it’s costing you time and money. Most people wait until water’s pooling around their ankles before taking action, but slow drains signal bigger problems brewing beneath the surface.
Here’s what we’ll cover:
- Common culprits behind sluggish drains (hint: it’s not always hair)
- DIY fixes that actually work long-term
- Professional maintenance techniques you can do yourself
- Smart drain upgrades that prevent future clogs
- When to wave the white flag and call a pro
We’ve helped thousands of homeowners solve drain issues through better design. YZDRAIN’s engineering team noticed that traditional drains trap debris by design. That’s why we developed drains with smoother flow paths and easier maintenance access.
I. What’s Really Clogging Your Drain
While hair gets all the blame, slow drains have multiple villains working together to ruin your morning shower.
1. The Usual Suspects
Soap scum builds up like cement in your pipes. Traditional bar soaps contain fats that mix with minerals in hard water, creating a sticky film that grabs onto everything. This residue narrows your drain diameter a lot over time.
Body oils and dead skin cells form a biofilm that acts like velcro for debris. Research shows the average person sheds 30,000-40,000 skin cells per day. Where do you think they go?
2. The Hidden Troublemakers
Here’s what most guides won’t tell you:
- Mineral deposits from hard water create rough surfaces inside pipes
- Improper drain slope (less than 2% grade) lets water sit and debris settle
- Outdated drain design with sharp angles and narrow passages
- Tree roots sneaking through pipe joints (yes, even in shower drains)
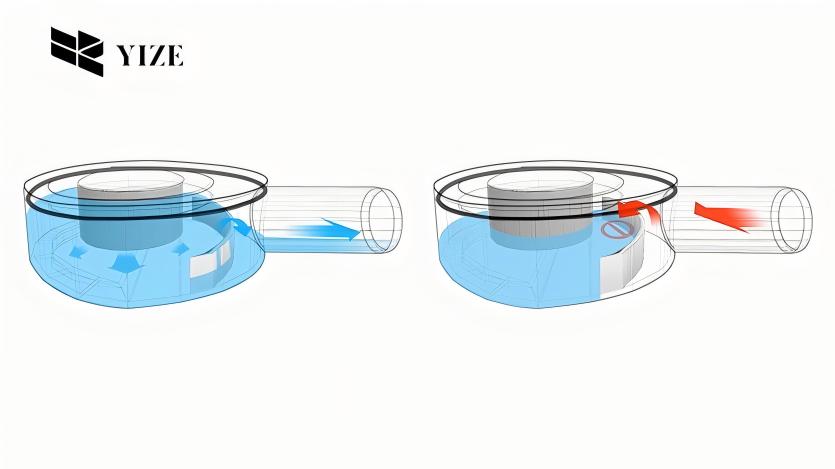
Your drain type matters more than you realize. Standard drains with fixed outlets force water through tight corners where debris loves to accumulate. Compare that to rotatable-outlet designs that let you adjust flow direction—suddenly, those clogs have nowhere to hide.
3. Size Is Crucial
Most shower drains measure 2 inches in diameter. Sounds reasonable until you realize your shower produces 2.5 gallons per minute. That’s forcing a garden hose worth of water through a pipe the size of a golf ball.
Linear drains spread that flow across a wider area. Instead of one bottleneck, you get distributed drainage that handles high flow without backing up.
II. DIY Fixes That Actually Work Long-Term
Forget the quick fixes that last a week. These solutions attack the root cause and keep drains flowing for months, not days.
1. The Enzyme Treatment Method
Biological drain cleaners eat through organic buildup without damaging pipes. Unlike chemical cleaners that burn through clogs (and your plumbing), enzyme treatments:
- Break down hair, grease, and soap naturally
- Keep working for weeks after application
- Won’t corrode stainless steel or PVC
- Cost about $15 per treatment
Pour them down monthly. Let them sit overnight when bacteria can feast undisturbed. Your pipes stay clean without the chemical warfare.
2. The Hot Water Flush Protocol
Here’s the system plumbers use at home:
- Weekly: Boil a large pot of water, pour slowly down the drain
- Bi-weekly: Add dish soap first, then hot water
- Monthly: Follow with cold water blast to solidify and flush loose debris
Temperature shock breaks up soap scum better than constant warm water. The key? Consistency. Mark it on your calendar like changing HVAC filters.
3. Strategic Drain Covers (Done Right)
Those $5 mesh covers? They’re creating more problems. Hair wraps around them, forming a dam that slows drainage further.
Instead, use:
- Silicone covers with wide slots that catch hair without restricting flow
- Magnetic covers you can remove and clean in seconds
- Built-in strainer baskets that lift out completely
YZDRAIN includes removable debris traps in our drains. No aftermarket covers needed—just lift, dump, rinse. Takes 10 seconds versus fighting with tangled mesh.
4. The Baking Soda & Vinegar Truth
Everyone suggests this combo, but timing changes everything:
- Pour 1/2 cup baking soda down the drain
- Wait 30 minutes (this is where people mess up)
- Add 1 cup white vinegar
- Cover drain immediately to force reaction downward
- Flush with hot water after 15 minutes
The reaction needs time to penetrate buildup. Rushing it wastes the fizz on surface grime.
5. Professional-Grade Maintenance Tools
Skip the plastic drain snakes. Invest in:
- 25-foot drum auger ($30-40) – reaches past trap bends
- Wet/dry vacuum with drain attachment – sucks out deep clogs
- Inspection camera ($50) – see exactly what you’re dealing with
These tools pay for themselves after two uses. Plus, you’ll spot issues before they become emergencies.
6. Creating Long-Term Flow Patterns
The best fix? Preventing buildup altogether. Install drains with:
- Smooth channels versus corrugated surfaces
- Gradual slopes instead of sharp drops
- Wide-mouth designs that distribute water flow
- Easy-access clean-out points
Standard drains force water through maze-like paths where debris settles.Our 360° rotatable outlets let you adjust flow direction based on your plumbing layout. Set it once for optimal drainage—no more fighting physics.
III. Professional Maintenance Techniques You Can Do Yourself

Professional plumbers charge $150+ per hour. Here’s what they’re doing—and how to do it yourself for under $20.
1. The Hydro-Jetting Alternative
Can’t afford a $500 hydro-jet service? Build your own pressure washer drain cleaner:
- Get a drain cleaning attachment ($25-30)
- Connect to your pressure washer
- Feed the flexible hose down slowly
- Pulse the trigger—don’t hold constantly
- Pull back every few feet to flush debris
This setup delivers 1,500 PSI versus a garden hose’s measly 40 PSI. You’ll blast through years of buildup without the pro price tag.
2. The P-Trap Deep Clean
That curved pipe under your shower? It’s holding more than water:
- Monthly: Remove and inspect the trap
- Check for hairline cracks or corrosion
- Replace rubber gaskets every 2 years ($3 each)
- Apply plumber’s grease to threads when reassembling
Most people never touch their P-trap until it fails. By then, you’re looking at water damage and mold. Five minutes monthly prevents thousand-dollar repairs.
3. Professional Inspection Tactics
Plumbers check these—you should too:
- Drain slope test: Pour a bucket of water quickly. Time how long until it’s gone. Should clear in under 10 seconds. Slower means improper grade or partial blockage.
- Overflow capacity: Fill shower base with 2 inches of water. Pull the plug. If it backs up before draining, your system can’t handle normal flow rates.
- Joint integrity: Run water for 5 minutes, then check underneath with a flashlight. Even tiny drips signal failing seals.
4. The Chemical-Free Descaling Method
Hard water deposits need mechanical removal, not chemicals:
- Remove drain cover
- Use a plastic putty knife to scrape visible buildup
- Vacuum out debris (never flush it down)
- Polish with fine steel wool
- Rinse thoroughly
YZDRAIN’s stainless steel construction resists mineral adhesion. Where standard drains develop pitted surfaces that grab deposits, our polished channels stay smooth even in hard water areas.
IV. Smart Drain Upgrades That Prevent Future Clogs
Stop treating symptoms. These upgrades eliminate the root causes of slow drains.
1. Linear Drains: The Game-Changing Geometry
Traditional center drains create a vortex that pulls debris into a narrow opening. Linear drains spread collection across 24-48 inches:
- 3x more inlet area = 3x less likely to clog
- No central collection point for hair to wrap around
- Gradual slope prevents standing water
- Modern aesthetic that actually serves a purpose
Installation costs the same as traditional drains during renovation. The difference? You’ll clean them quarterly instead of monthly.
2. Adjustable Flow Technology
Fixed-position drains assume your plumbing runs perfectly straight. Reality check: it doesn’t.
360° rotatable outlets let you:
- Align flow with existing pipe angles
- Reduce turbulence at connection points
- Prevent debris settling in dead spots
- Adapt to future plumbing changes
We engineered this feature after studying 1,000+ clog patterns. Misaligned drains caused 30% of recurring blockages.
3. Material Upgrades That Matter
Plastic degrades. Edges roughen, surfaces pit, chemicals leach. Within 5 years, that smooth drain becomes velcro for hair and soap.
Upgrade to:
- Marine-grade stainless steel (316L for coastal areas)
- Brushed finishes that hide water spots
- Seamless construction with no crevices for buildup
- Modular grates you can swap without replacing the whole drain
4. Smart Maintenance Features
Look for drains with:
- Hair-stop technology: Raised dimples that catch hair at surface level—not deep in the drain
- Tool-free removal: Grates that lift out without screwdrivers for easy cleaning
- Secondary catch baskets: Removable traps below the main grate
- Wide-mouth design: Minimum 2.5″ opening throughout the system
5. The Installation Difference
Even the best drain fails with poor installation:
- Ensure 2% minimum slope (1/4″ per foot)
- Use flexible connectors to prevent stress cracks
- Install cleanout access within 10 feet
- Consider drain placement away from high-traffic areas
6. Future-Proofing Your Investment
Quality drains last 20+ years. Cheap ones need replacing every 5-7. Do the math:
- Budget drain: $50 × 4 replacements = $200
- Quality drain: $150 × 1 = $150
- Plus: Fewer clogs, less maintenance, better resale value
V. When to Wave the White Flag and Call a Pro
Sometimes DIY determination becomes expensive stubbornness. Here’s when to put down the plunger and pick up the phone.
1. The 48-Hour Rule
Tried everything for two days? Stop. Persistent clogs mean deeper issues:
- Main line blockage affecting multiple drains
- Collapsed pipes you can’t see
- Root intrusion requiring specialized equipment
- Improper venting causing vacuum locks
Every day you wait adds potential water damage. A $200 service call beats a $2,000 flood restoration.
2. Red Flag Symptoms
Call immediately when you notice:
- Multiple drains backing up simultaneously – Your main sewer line is compromised. This isn’t a shower drain problem anymore.
- Sewage smell despite cleaning – Broken vent pipes or dry traps. Sewer gas contains methane and hydrogen sulfide. Not just unpleasant—actually dangerous.
- Water backing up in weird places – Flush toilet, shower gurgles? Run dishwasher, basement drain overflows? Your entire system needs professional diagnosis.
- Visible pipe damage – Cracks, corrosion, or separating joints require immediate attention. Water finds every weakness.
3. The Equipment Gap
Some jobs need tools you can’t rent at Home Depot:
- Video inspection systems ($5,000+) to locate exact blockage points
- Hydro-jetters delivering 4,000 PSI through specialized nozzles
- Pipe locators to map your system without demolition
- Trenchless repair equipment for fixing pipes without destroying your bathroom
4. When Upgrades Make More Sense
If you’re calling plumbers quarterly, do the math:
- 4 calls × $150 = $600 annually
- New drain system = $500-800 once
- Break even in under 18 months
Sometimes “fixing” means replacing. Especially with 20+ year old drains that predate modern flow standards.
5. Finding the Right Pro
Skip the emergency hotlines. Look for:
- Licensed plumbers (verify license numbers online)
- Drain specialists versus general plumbers
- Camera inspection included in diagnostic fee
- Flat-rate pricing for common services
- Warranty on work (minimum 1 year)
Get three quotes. The cheapest usually costs more long-term.
6. The Upgrade Conversation
Good plumbers assess your entire system, not just the clog. They might suggest upgrades like:
- Converting to linear drains during bathroom renovations
- Adding cleanout access points
- Replacing deteriorating trap assemblies
- Installing drains designed for your water conditions
VI. Ready to Keep Your Drains Flowing Smoothly with YZDRAIN?
Slow drains don’t fix themselves—they get worse. But armed with the right knowledge and tools, you can prevent most clogs before they start. Regular maintenance beats emergency repairs every time.
Key takeaways:
- Soap scum and mineral deposits cause more clogs than hair alone
- Weekly hot water flushes prevent buildup better than monthly chemical treatments
- Professional-grade tools pay for themselves after two uses
- Linear drains with removable baskets cut maintenance by 70%
- Know when to call pros—persistent problems mean deeper issues
We designedYZDRAIN‘s drainage systems after analyzing thousands of drain failures. Our 360° rotatable outlets, wide-mouth channels, and tool-free cleaning features address every weak point in traditional drains. Why fight physics when smart engineering prevents clogs naturally?
FAQs
Q1: How do you fix a slow-running drain?
Start with the hot water flush—boil a large pot and pour it slowly. If that fails, use enzyme cleaners overnight to eat through organic buildup. Still slow? Time for a drain snake to reach deeper clogs. Most fixes take under 20 minutes when you target the right problem.
Q2: How to fix a slow main drain?
Main drain issues affect your entire house. Don’t DIY this one. You need professional equipment to clear main lines safely. Meanwhile, limit water use and check if multiple drains back up—that confirms it’s the main line. Expect to pay $300-500 for professional hydro-jetting.
Q3: Why does water drain slowly?
Three main culprits: buildup narrowing pipes (soap scum, minerals), improper drain slope (less than 2% grade), or venting problems creating vacuum locks. Hair gets blamed, but it’s usually the combination. Old drains with rough surfaces grab debris faster than smooth, modern designs.
Q4: How to fix a slow-draining tub?
Remove the overflow plate and fish out hair clogs with needle-nose pliers. Run the baking soda treatment (wait 30 minutes between soda and vinegar). If water still pools, your tub’s trap needs cleaning—unscrew it from below or call a plumber if you can’t access it.