I. Introduction
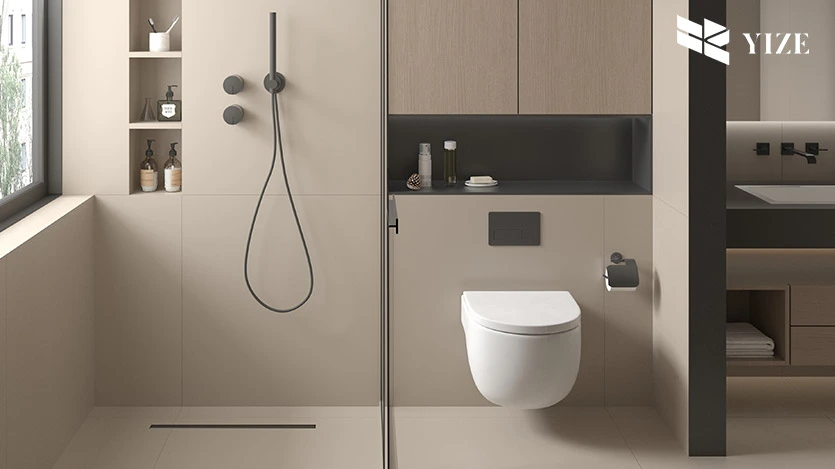
In recent years, curbless showers have gained popularity because of their simplicity and aesthetics. Bathtubs add a touch of elegance to bathrooms and are ideal for giving the bathroom an open and contemporary look. The most important item in curbless shower design is the linear shower drain. This not only gives the shower an aesthetic appeal but also assists in proper water discharge in the structure. Here, the installation steps of a linear drain in a curbless shower are described in detail using products of YZDRAIN as examples.
II. Understanding Curbless Showers
1. What is a Curbless Shower?
A curbless shower is a shower design type without any raised edge or threshold of the type that would present a barrier. There is no curb separating the floor of the shower from the rest of the bathroom floor so a person can easily be wheeled or walk into the shower. The fact that this type of shower is accessible and has a rather contemporary look is its advantage.
Curbless showers are particularly suitable for those with mobility issues as access and egress are not problematic. In the same manner, these showers are easier to maintain clean since there are no corners where dust and particles can settle. They are equally appropriate for use in most bathrooms; large or small, basic or opulent.
2. Why Choose a Linear Shower Drain for Curbless Showers?
Linear drainage systems are also preferred in curbless shower applications since they are attractive and easy to use. The shower features a linear drain installed along one side of it, instead of water draining in all directions. This improves the general outlook and gives a neat touch of modern neatness and simplicity.
It is also important to note that linear drains are not merely aesthetic they serve a purpose. They enhance water flow through them and assist in ensuring the bathroom floor does not become slippery. Since the drain is larger than a round drain, water leaves the shower faster than in the case of using a round drain. Due to this, using linear drains makes showers curbless showers a safe and efficient option to consider.
III. How to Build a Curbless Shower
1. Planning and Preparation
When preparing to construct your curbless shower, it is crucial that you have the right preparations in mind. In the first step, it involves compiling all the required equipment and supplies that are needed for the work. You’ll need the following:
●YZDRAIN linear drain
●Waterproof membrane
●Tiles and thin-set mortar
●Shower pan
●Leveling tools
●Plumbing materials
●Screws and mounting hardware
When all preparations are in place, you should ensure that you plan the layout of the shower area well. You should also look up the codes of your state to see if your designed project is compliant with safety and structural standards. Another important factor is planning the direction of water flow as it should be designed to fall into the linear drain installed along the length of the shower.
2. Where Do You Put a Linear Shower Drain in a Curbless Shower?
The placement of your linear drain is crucial for efficient water disposal of your home or commercial building. Linear drains can be installed in several places in a curbless shower:
●Side Entry: Installing the drain at one side of the shower ensures that the water flows across the floor and gathers at a specific end.
●Wall-to-Wall: One of the most effective designs in removing water is to have a linear drain that runs across the width of the shower base.
●Center Placement: However, the linear drain can also be installed along the middle of the shower area, although it is less often used.
Make sure you are able to connect the drain to the angle of the shower floor. The floor of a shower should have a slight incline to the drain, ideally it should be at a gradient of 1/4 inch per foot to prevent water from getting stagnant.
IV. Two Different Drain Options for Curbless Showers
1. Traditional Linear Shower Drains
These traditional linear drains are fixed along the one line of shower and are straight. They are easy to install and they give the device a very clean exterior view. These drains are perfect for most standard curbless showers and are offered in diverse sizes and finishes to accommodate diverse bathroom designs.
For a regular linear drain, one needs to make sure that the floor of shower has a slight gradient towards the drain. Fix the drain body in a proper manner to the floor and ensure it is fitted to the existing plumbing system. The next step involves applying a waterproof membrane to the area before tiling it.
2. Trench Linear Shower Drains
Trench drains, on the other hand, are slightly wider and are made for dealing with large amounts of water. They are usually found in larger showers or bathrooms where the need for better drainage is called for. Trench drains differ from other linear drain but they are installed in the same way, only that they cover more space.
This makes them suitable for individuals who want showers with a lot of water flow since the wider design gives the heads the capacity to hold more water. Their installation process includes placing the drain into a dug hole in the floor, and making sure that it is properly connected into the plumbing system.
V. How to Install a Linear Shower Drain in a Curbless Shower

Step-by-Step Installation Guide
●Prepare the Shower Area: This process begins with washing andрамингout the area where the shower is to be installed to provide a flat surface. It is essential to clear any old materials and guarantee that the subfloor is sound and flat.
●Set Up the Waterproof Membrane: This layer is particularly important because it provides the waterproof barrier and, without it, leaks could occur. Trowel the membrane over the shower floor and walls, and even beyond the shower’s boundaries to produce a water barrier.
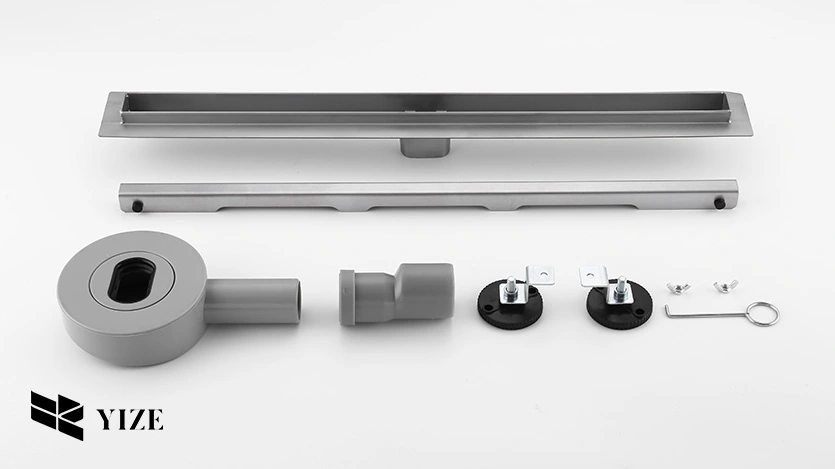
●Position the Linear Shower Drain: After the waterproofing is properly put in, install the YZDRAIN Waterproof Linear Shower Drainer at the position you have decided on. Make sure that it is parallel to the slope of the shower floor. Make sure the drain is securely fastened with the mounting equipment that will be included.
●Connect to the Plumbing: Ensure and install the linear drain to the current plumbing system of your bathroom. It is important that each joint is properly sealed to ensure that there is no leak. Check the connectivity by passing water through the system and only then move to the next step.
●Ensure Proper Slope and Alignment: Make sure the slope of the unit on the shower floor is upwards towards the linear drain and check it twice. It should be leveled and its gradient should not be very steep to allow for standing when using the shower.
●Finish with Tiling: After that, apply thin-set mortar and place your tiles on the shower floor and walls. Make sure that the tiles are properly affixed on the surface and wait for them to dry.
VI. Prefabricated Shower Bases for Curbless Showers
1. Benefits of Using Prefabricated
BasesIf you prefer a complex installation method, then you might want to consider going for a prefabricated shower base. These comprise bases with integrated slopes to properly direct drains and to do away with the need for manual slope adjustments. They are long-lasting, and stable, and can possibly increase the lifespan of your curbless shower.
2. Options and Installation
The most commonly used bases are prefabricated and come in many shapes and sizes and can be made from various materials. The process of installing a prefabricated base begins with preparing the subfloor. Place the base on the subfloor and fasten it thoroughly. Next, use the fixture fittings to fit the linear drain to the base of the bathtub. Ensure that all loose ends are well sealed and everything laid down properly the last touches being making use of tiles.
VII. Conclusion
There is a preferred method of laying down the linear drain in the curbless shower, and when this method is followed, then laying down the drain is relatively easy. As long as there is good planning of the overall space, material selection, and a focus on achieving the appropriate slope for drainage, your curbless shower will not only look trendy and minimalist but also function flawlessly.
Choosing one of the high-quality linear drains of YZDRAIN is beneficial for improving the appearance of the shower and its functionality. It is always advisable to seek advice from an expert in this field to make sure that meeting all the legal requirements is observed during the installation process.
FAQs
1. What is a curbless shower?
A curbless shower is one that has no barrier between the shower area and the rest of the bathroom space, which means that the floor of the shower is at the same level with the rest of the bathroom floor. This design makes it easier to take shower, easier to clean, and gives the shower a completely new look that looks modern.
2. How does linear drain function within a curbless shower?
When compared to traditional shower drains, a linear drain lays the drain along one edge of the shower to provide better water flow. This also helps in the modernization of the bathroom design and also helps in improving on the security by avoiding too much accumulation of water.
3. Where can I install a linear drain in a curbless shower?
Linear drains can be installed in various configurations like; side mounted slightly off center, side mounted wall to wall, or centrally between two walls. The idea is to use it in conjunction with the inclination of the floor to allow proper drainage of water