You are here to learn how to install a shower drain. Let me give you a disclaimer: you must follow each step discussed in this article carefully to achieve success. Otherwise, hire a professional shower drain services. Let’s start with choosing the right shower drain type.
I. How to Choose the Right Shower Drain Type?

Buy the correct type and quality shower drain before starting the process of installation. The product you choose must match your shower design and preferences. Here are some shower configurations for drain types and learning about them is very important to get started adequately.
| Square Drains | These work well in traditional and modern shower spaces. |
| Linear Drains | I recommend these for modern walk-in showers because they offer a minimalist and sleek look. A linear drain also allows for a single-slope floor design. |
| Triangle Drains | These are ideal for corner showers because they maximize the space and maintain aesthetic appeal. |
Very important: Make sure you choose a train that matches or complements your bathroom’s design. At the same time, it must channel water away from the shower area effectively. Again, I urge DIYers to consider both functionality, quality, and appearance when choosing such a product.
II. Tools and Materials for Installing a Shower Drain
- Shower drain kit (includes drain body, grate, strainer)
- Adjustable wrench and screwdriver
- PVC pipe cutter for precise fits
- PVC primer and cement for secure connections
- Plumber’s tape to create watertight seals
- Silicone sealant for additional waterproofing
- Measuring tape for accurate placement
- Waterproofing membrane to prevent leaks
- Mortar or adhesive for secure installation
- Rubber gloves and safety goggles for protection
Don’t skip any of these times. Otherwise, you won’t achieve a reliable end-product and may experience interruptions during the installation process.
III. Steps to Install a Shower Drain
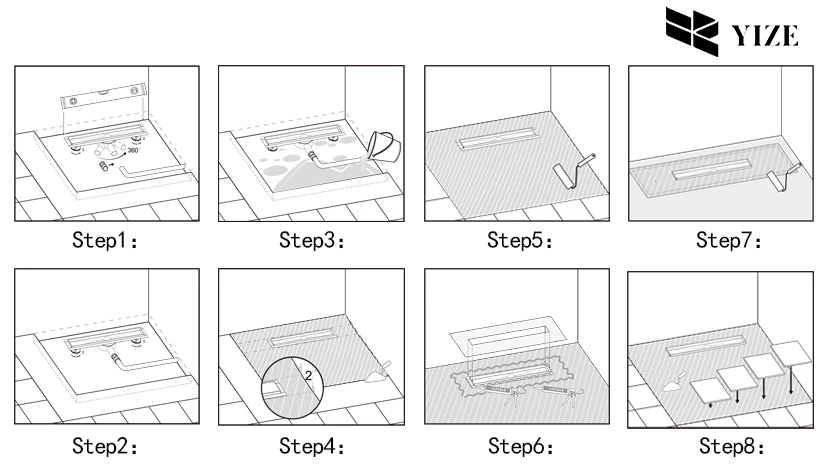
Talking about some basics of shower drains, tools, and materials was important before I could answer how to install a shower drain. So, let’s get into the real business now. Here are the steps:
Step 1: Prepare the Shower Area
Where do you want the shower drain? Determine the exact position. Ensure the floor slopes correctly toward the drain location for proper drainage. Remember, you must relocate the existing pipework if you are renovating.
That way, you can accommodate a new drain position. Next, clean the subfloor and remove the debris to create a clean surface for better adhesion and sealing. So, this will prevent issues with leaks in the future.
Step 2: Install the Drain Flange
Installing the drain flange forms the foundation for a shower drain because it connects to the plumbing system. So, insert the drain flange into the shower base drain hole and apply the plumber’s tape to the treads for a watertight seal.
Next, use an adjustable wrench to tighten the drain flange securely. You must carry out this carefully, as any leaks can cause significant water damage. Basically, you need to take your time to get this step right.
Step 3: Prepare and Set the Drain Body
Use a silicon adhesive. Apply it to the underside of the rain body flange. It will help you create an even layer all around. The purpose is to create a watertight seal between the shower base and the drain. Now, install the drain body into the shower base before you position the base.
Next, insert the drain body from the top. Make sure you press it firmly so the silicon adhesive can form an even seal. Wipe away excess adhesive while it is wet using rubbing alcohol and paper towels.
Step 4: Connect and Secure Components
Slide the rubber washer and slip washer around the drain body from the bottom side of the shower base. Once done, just thread the drain nut onto the drain body. Remember, you must hand-tighten the nut first and then use a wrench to tighten it approximately half a turn more.
Moreover, set the shower base in place to ensure the drain body aligns with the drain pipe. If you can’t carry out this yourself, make sure you get help from your family member or friend. I believe this step works best with two people. So, place the back of the base against the wall stud first and then lower the front to the floor.
Step 5: Align and Complete Assembly
Once you have positioned the base, adjust it to center the pipe within the drain body. Proper alignment is necessary for the accurate installation of the compression gasket. If you are installing a linear shower drain, make sure you assemble the drain gate to the drain channel and then attach the clamping right to the drain flange. Next, install the gasket into the drain flange and fasten everything with screws.
Step 6: Test Everything
Run water through the drain. Check for leaks. If you find any issues, fix them immediately before finalizing the installation process. Here are a few recommendations:
- Make sure the shower drain unit is level and stable.
- Ensure the top of the drain body sits flush with the surface of the finished floor.
- Apply a silicon sealant to the outside of the shower drain for additional leak protection.
IV. Final Words
I have given you a complete step-by-step guide to installing a shower drain. However, I recommend you study more until you have a good knowledge of shower drains to achieve a perfect installation. Keep an eye on our guides and blogs for the latest and helpful information.
FAQs
Q1: How long does it take to install a shower drain?
You can complete the installation process within 2 to 4 hours. However, the exact time depends on how efficiently and smoothly you carry out the process.
Q2: Should I hire a professional to install a shower drain?
Many homeowners successfully install shower drains themselves with basic plumbing knowledge and essential tools. Follow the steps above to get the job done. If you feel you can’t do it, then hire a professional.
Q3: What size drain pipe works best for a standard shower?
Most residential shower drains connect a two-inch drain pipe. However, you may need larger pipes for increased water flow, especially if you are installing a linear drain or a high-volume shower.
Q4: How do I maintain my shower drain after installation?
Clean the shower drain regularly to remove soap and hair buildup. Remove the drain cover at least once a month to clear debris. Use vinegar and baking soda to ensure the shower drain is completely cleaned. Just pour that mixture down the drain and wait for 30 to 50 minutes, then flush with hot water.