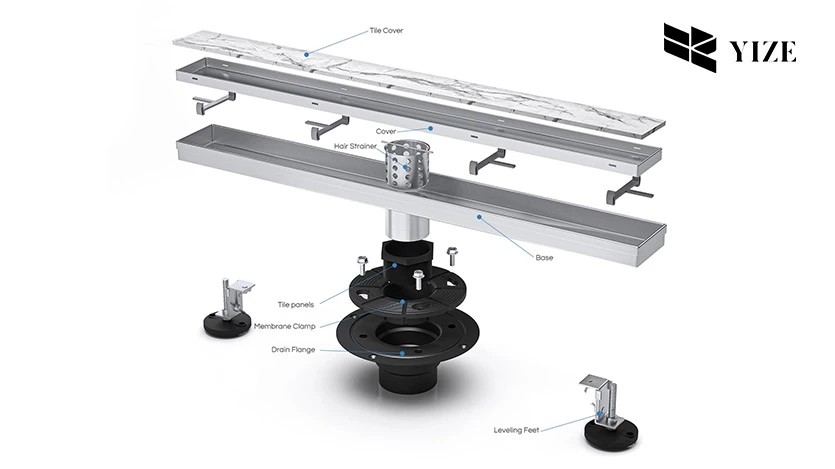
I. Introduction
Tile insert floor drains are a modern and elegant design of the floor drains that can be used in the bathroom and other tiled surfaces. A tile insert floor drain looks and functions differently from typical drains that come with a metal or plastic grate visible on the surface of a floor. Besides giving your interior an appealing outlook, this design allows a seamless interconnection of the drain with the floor.
To have a proper working of the tile insert floor drain, it is crucial to ensure that it has been installed properly. This should be done carefully in order to avoid problems like cases of infiltration of water, improper flowage and alignment problems which can affect the performance greatly. This guide will assist in providing methods on how to install your tile insert floor drain in the most proper way for it to perform efficiently for the longest time.
II. What You Need Before You Start to Install a Tile Insert Floor Drain
Compile a list of all the equipment that will be required before starting the project to avoid making many trips as the project progresses. This way there will no excuses for delay and all the necessary procedures will be in place.
1. Tools and Materials Required
●Tile insert floor drain kit
●Measuring tape
●Pencil or marker
●Tile cutter (manual or electric)
●Level
●Trowel
●Thin-set mortar or adhesive
●Grout
●Rubber mallet
●Silicone sealant
●Sponge
●Safety gear (gloves, safety glasses, etc.)
2. Choosing the Right Tile Insert Floor Drain
Different til insert floor drains are developed in different ways but all serve the same purpose of removing waste water from a particular area. It is also important to select a drain that complements the thickness of the tiles and the general layout of the floors. The following is the list of tile insert floor drain that is produced by YZ Drain: When choosing a drain, always consider the size, shape, and compatibility with the type of tiles you intend to lay.
III. How to Install a Tile Insert Floor Drain: 5 Steps
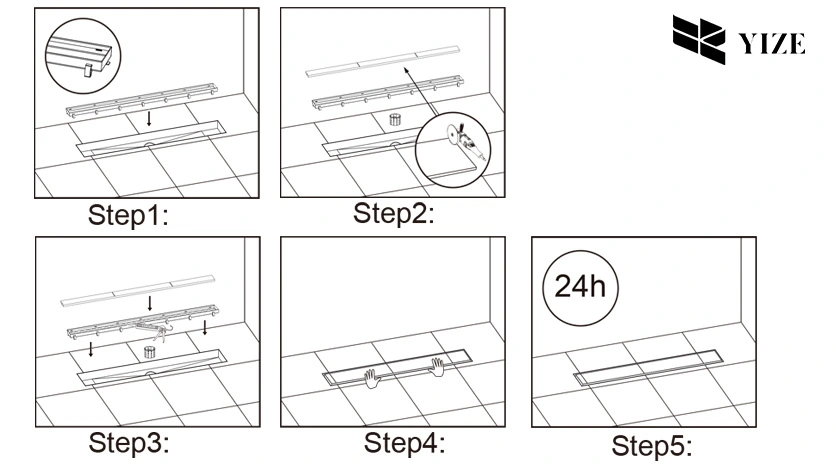
1. Marking and Cutting the Tile
The former involves marking and cutting of the tile following the drain scooped on the floor plane. Check the size of the area in which you intend to place the drain, then draw its shape in pencil or marker on the tile.
●How to Accurately Mark the Tile: Find out the size of the tile insert drain. Draw a straight line on the tile on pencil so that it can be used to guide and ensure an accurate cutting process.
●Cutting the Tile: The best approach to use when cutting tiles is to use a tile cutter or an electrical wet saw. Ensure that while cutting, your hands and your eyes are protected by using the right protective gear. Take your time when working on the tile and ensure that you do not scratch or chip the tile while working on it.
2. Fitting the Drain Base
After the tile is cut, the process goes to the next level which is the laying of the drain base.
●Placing the Drain Base: Spread thin set mortar or adhesive on the sub floor where the drain is to be positioned. Ensure that you place the drain base in the correct position.
●Ensuring Proper Alignment: Ask for a level to ensure that the drain base lies parallel to the floor and does not have slopes. It has to fit well onto the base, any unevenness in the base is passed onto the tiles which may spoil the look of the floor as well as hinder movement by the users. Wait until the mortar has gained some strength based on the instructions provided by the mortar manufacturer.
3. Installing the Drain Body
Once the base is in place and well-fixed, it will be possible to fix the drain body into its proper location.
●Positioning the Drain Body: Place the drain body into the base and make sure that for it to come out of the base a firm push is needed. Also, check that the drain body is well aligned and/is in good position before it is fixed to avoid leakage.
●Sealing the Drain Body: Seal a silicone around the joint of the drain body to make sure it cannot leak water. This process is necessary to reduce any chances of having a leakage situation that would affect the existing floor.
4. Tiling Around the Drain
After the drain body is set, it is time to start tiling the surrounding space of the drain.
●Laying the Tiles: Spread a thin layer of mortar around the drain in a slick fashion. Place the tiles into position, making sure that they touch the edge of the drain. To ensure that the surface is flat, you have to gently pound the tiles into shape using a rubber mallet.
●Grouting and Sealing: After the tiles are arranged, use grout to fill the gaps between the tiles. Remove the excess grout by wiping it off with a damp sponge while it is still wet. Wait for the grout to harden, then apply a coat of sealer, which will help minimize the possibility of water infiltration at the joints.
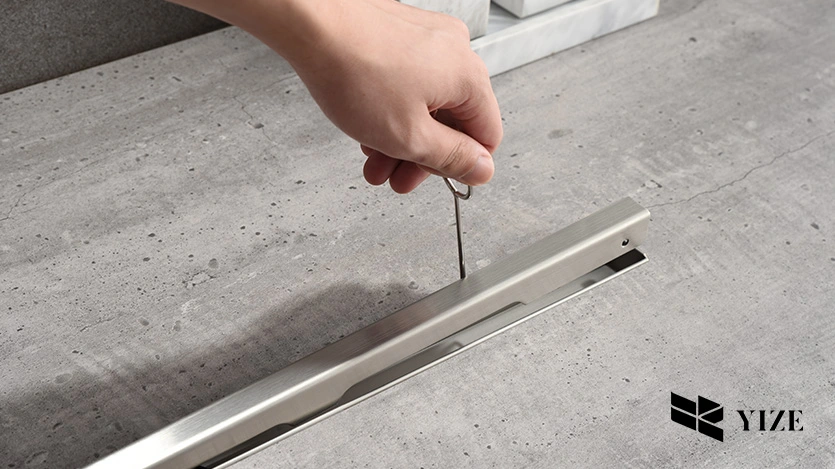
5. Placing the Tile Insert
The last process of the installation involves fixing the tile insert into the drain body.
●Fitting the Tile Insert: After having received the tile piece which is to be fitted in the tile insert frame, proceed to fit this piece into the drain body properly. Make sure the tile is in perfect level with other tiles to ensure that the surface does not have any gaps in between.
●Securing the Tile Insert: The position and orientation must be correct and any possible adjustments should be made. The insert must lie flat on the ground and should not be able to be shifted or twisted in any way. Make sure that the tile insert fits into the tile design and aligns seamlessly to produce a copied effect of a drain mesh.
IV. How to Troubleshoot Common Issues with Tile Insert Floor Drains
However, there are several problems that may arise even if the installation has been properly conducted. Here’s how to address them:Here’s how to address them:
●Misalignment: If the tile insert is not level with other tiles, then it should be taken out to check whether the mortar used is uneven or if there is some debris on the surface. Reposition the insert and reinsert it back into its proper position.
●Leaks: If water is dripping at the corners especially around the drain then could be a problem with the silicone seal. Scrape off the old sealant and apply a brand new bead of silicone around the drain body.
●Drainage Problems: If water isn’t draining properly, this should be due to obstruction of the drain or wrong gradient of the adjoining tiles. Ensure that the drain is open and the floor slopes slightly to facilitate water flow towards the drain.
V. How Do I Clean and Care for My Tile Insert Floor Drain?
Routine Maintenance: Cleaning your tile insert floor drain properly is the key to ensuring that it lasts long without developing any issues. Occasionally, it is advisable to take out the tile insert and wash out any dirt or soapy agents that may have accumulated. The drain components should be cleaned by using mild detergent with a brush.
1. How Often Should You Clean It?
It is advisable to clean the drain every few months or more often if you realize that water is drained slowly.
2. Preventing Clogs
To avoid blockages, install a drain guard or hair trap to stop large debris from getting into the drain. The drainage should be checked and maintained to ensure that they drain well and not to require repair services that could be costly.
VI. Where is the Best Tile Insert Floor Drain?
If you are searching for tile insert floor drains for your building project, you can consider YZDRAIN. YZDRAIN has been noted for accuracy of its designs and strong, long-lasting products that fit together seamlessly.
Top Benefits of YZDRAIN
●Excellent material and workmanship
●Excellent customer feedback
●Many options available based on tile size and decoration.
By opting for YZDRAIN you will have a product that is designed to provide unmatched drainage performance as well as an aesthetically pleasing floor finish.
VII. Conclusion
A tile insert floor drain is a better way of improving the appearance of your bathroom or any other tiled area. If you follow these steps mainly, you can achieve good results that seem like they were professionally done. Just to summarize, the right setup and occasional care will guarantee the work of your drain and the absence of problems in the coming years. Based on that assumption, I would like to say that anyone looking for a premium tile insert floor drain should give YZDRAIN the consideration it deserves due to its exceptional quality and efficient functionality.
FAQs
1. What is the time required in the installation of a tile insert floor drain?
It usually takes several hours to install it, depending on your experience and the pattern of tiles chosen.
2. Is it possible for anyone to install a tile insert floor drain on their own?
Yes, it is possible to install a tile insert floor drain with the help of proper tools and paying much attention to details.
3. How can I keep the tile insert floor drain clean and in good condition?
It is enough to clean the tile insert floor drain daily and sometimes inspect it to ensure it is in good condition.