I. Introduction
A linear drain shower pan is a modern solution for showers that provides almost invisible and minimalist appearance, which is highly appreciated in the curbless shower designs. In today’s trends, many homeowners find ways and means to increase the value of their property now how to install a linear drain shower pan is something very important to know. The process is explained here as much as possible while providing ideas and solutions on how to save space and addressing frequently asked questions. Choosing the appropriate drain as well as shower pan contributes a lot in improving the appearance of the shower area besides ensuring there is proper drainage for water.
II. What Type of Drain Is Best for a Curbless Shower?
Different types of drain mechanisms are available in the market and the choice depends on the kind of curbless shower that is being constructed. The most suitable solution in the case of a curbless shower is usually a linear drain. Compared to round or square drain installed at the center of the shower, the linear drains are fixed along the length of the shower. This makes the water to drain in a balanced manner towards the drain while avoiding the necessity of having a curb.
There are several advantages of linear drains for the curbless showers:
- Accessibility: Linear drains are designed to cover a great territory to collect water and are suitable for shower bases with small slopes or without curbs at all.
- Stylish look: As it is long and slender in shape it has a perfect design for any new generation bath area.
- Easy to Clean: Since the linear drains are installed along the perimeter of the shower space, cleaning is made easier since most debris and grime fall outside the shower area.
Thus, it can be claimed that the gradient is the most critical component of linear drain installation in curbless showers. Proper slope also directs water to the drain and avoids puddling of water thus making drainage to be effective.
III. What Is the Best Size for a Curbless Shower?
Generally, the size of a curbless shower will depend with the available space that one has in the bathroom and the size that he or she may prefer. But there are certain rules that one has to be aware of when using the Liquid Metal language.
General Guidelines for Size:
- A curbless design in a small bathroom: For a shower space it is advisable to have a 3×3 feet or 3×4 feet area in a small bathroom. You however must make sure that there is adequate space for the linear drain to function properly.
- Standard showers: If there is available space then shower size of 5×3 feet or 6×3 feet will be good enough. This makes the enclosure to be less boxy and compact with enough space for someone to walk into it besides creating enough space for the linear drain.
- Standard size: A good measuring for large showers is the 6 x 6 feet or greater and can allow for two shower head fixtures or seating. Due to such sizes, you have to get a linear drain that is longer in a way that it will accommodate the high flow rate of water.
In essence, a general guideline would be to afford the space ample slope towards the drain. In regards to the slope, they recommend that the slope of the shower floor should not exceed 1/4 inch per foot.
IV. How to Build a Shower Pan with Linear Drain?
Linear drain shower pan installation comes in the following steps that are crucial for the proper early flow or water drainage. Here is a comprehensive procedure in which you can follow step by step:
Step 1: Prepare the Area
After this, one should measure and mark the area in which the shower pan is to be put. Prepare the area: it may require scraping off any old floor, tiles or other types of floor coverings, and check for any unevenness or debris on the subfloor. Besides, it is advisable to verify the elevation of the subfloor to determine the ideal slope of the subfloor in order to facilitate easy flow of the water to the drain.
Step 2: Install a Waterproof Membrane
In fact, the major reason for constructing a building’s roof is to ensure that it is protected from water and thus, minimize growth of molds and mildews. Lay and extend it to the shower walls and ensure you lay a waterproof membrane on the subfloor. This helps in preventing water from seeping to the surrounding areas, which may present considerable harm if not well checked. Seams should join after each other and all the borders should be sealed properly.
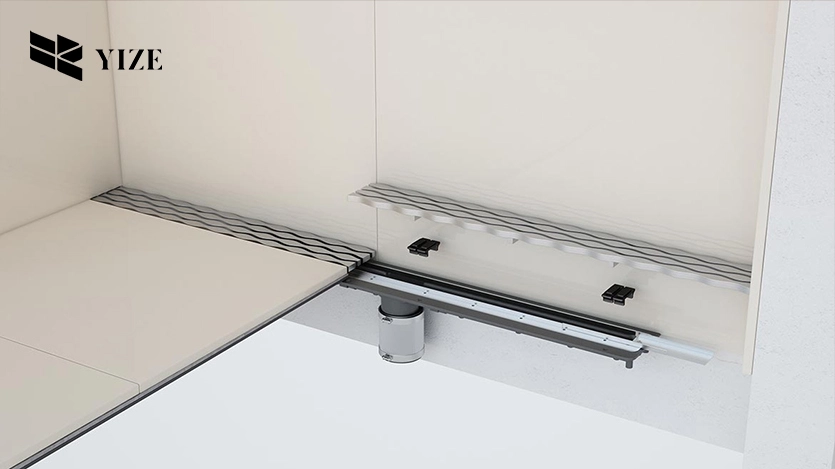
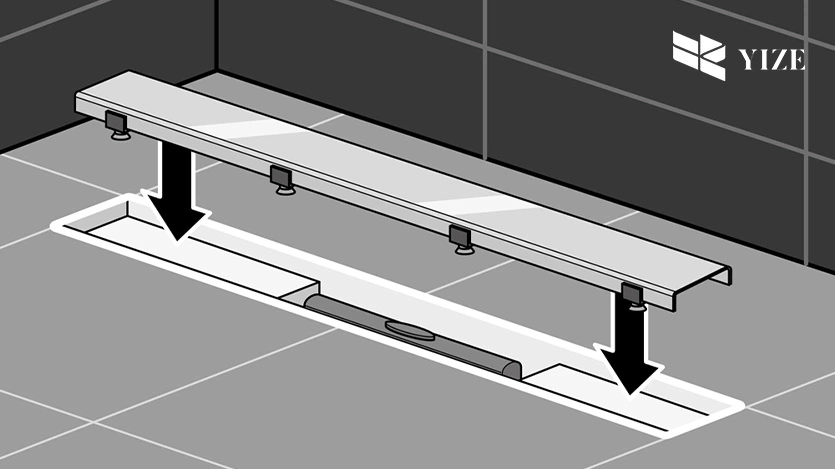
Step 3: Install the Linear Drain
The following one is to install the linear drain properly and effectively as per the size and scope of the area to be covered. There are two main types of linear drains which include the ones that are leveled with the floor and those which are slightly installed below the flooring. Make sure that the drain is installed properly, and its position indicates how the water collecting at the drain area should move in the direction of the drain.
In the case of a shower that has a linear drain shower pan, the most probable type of drain that you will see is the one that runs along either the side of the shower, or even in the middle. The length should be determined by your shower size, but it should accommodate the coming out flow of water from the shower fixtures.
Step 4: Create the Slope
This means that the floor in this case should be designed to have a downward slope towards the linear drain. This can easily be done with the help of a ready-to-slope shower pan or using a layer of deck mud (sand, cement and water). The slope is usually ¼ inch per foot but it should be able to drain water from the shower area effectively.
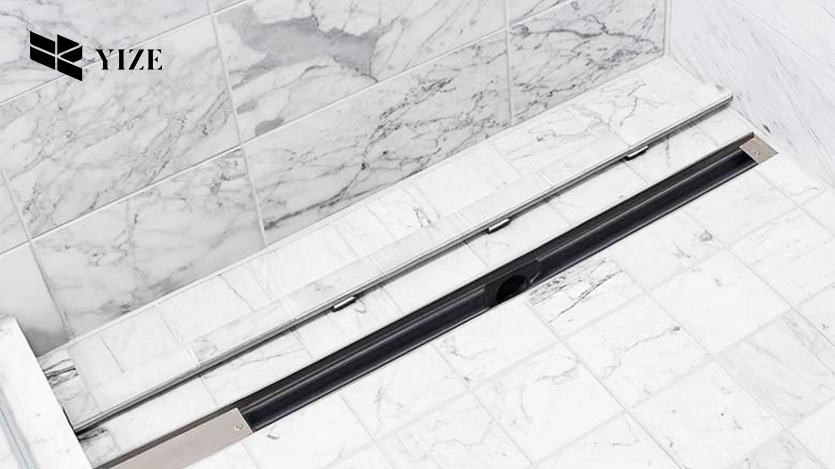
Step 5: Install the Tile
After a slope is laid down and the linear drain installed, it becomes a suitable time to add your shower tiles. Ceramic tiles should have non-slippery and should have the capacity of resisting water. Ceramic and porcelain tiles are commonly used due to this since they are hard wearing. One of the possibilities is the necessity to cut the tiles to place them around the linear drain. It is also important to arguments that the tiles are sealed and grouted well in order to avoid water finding its way behind the tiles.
Step 6: Test for Leaks
In addition, you should always ensure that the drains do not leak before completing the process. Open the shower to check if water flows down the right way and if there is any formation of pools where they are not supposed to be. If everything goes according to the plan, then you can have your brand new shower and enjoy it to the fullest.
V. Space-Saving Tips for Your Shower Area
When designing a curbless shower with a linear drain, space-saving is often a priority, especially in smaller bathrooms. Here are a few tips to help you make the most of your shower area:
1. Use a Wall-Mounted Showerhead
By opting for a wall-mounted showerhead, you’ll free up floor space and create a cleaner, more open look in your bathroom. These types of showerheads are easy to install and help make the area feel less cluttered.
2. Consider a Niche for Shower Storage
Shower niches are great for storing toiletries and shower essentials. Install one or two niches in the walls to avoid the need for bulky shower caddies or shelves, which can take up valuable space.
3. Install a Glass Shower Screen
A glass screen, rather than a traditional shower curtain or a full door, helps keep the area open and airy. This option prevents water from splashing outside the shower area, while still giving you a more open feel.
4. Keep the Floor Open
Since linear drains are designed to work efficiently in curbless showers, keep the floor free of obstacles. Avoid unnecessary features like raised edges or bulky tiles that can disrupt the sleek, space-saving aesthetic of a curbless shower.
VI. Conclusion
Installing a linear drain shower pan is a practical and modern solution for curbless showers. With the right tools, materials, and techniques, you can create a beautiful, functional shower space that maximizes drainage and enhances your bathroom’s overall design. By following the steps outlined in this guide, along with the space-saving tips, you’ll be well on your way to creating a sleek and efficient shower that’s easy to maintain. Whether you’re upgrading an existing shower or building from scratch, the linear drain shower pan offers both style and practicality for modern bathroom designs.
Frequently Asked Questions (FAQs)
Q1: How much does it cost to install a linear drain shower pan?
The cost can vary widely based on factors like the size of the shower, the type of materials used, and professional labor costs. On average, expect to pay anywhere from $1,500 to $5,000 for materials and installation.
Q2: Can I install a linear drain shower pan myself?
While it’s possible to install a linear drain shower pan yourself, it requires some level of expertise, particularly in ensuring proper slope and waterproofing. If you’re unsure, it’s best to consult a professional.
Q3: What is the lifespan of a linear drain?
Linear drains can last for decades when properly maintained. High-quality materials like stainless steel are corrosion-resistant and built to last.